

How to Install AR-Rifle Gas Blocks
Posted by Gus Norcross on 6th Jul 2022
AR-rifle gas blocks are available in many styles; this guide will help you choose parts for the build and demonstrate installation techniques.
By Gus Norcross
The year: 1977. I was a young Cav trooper serving in Jimmy Carter’s Army. We lined up in front of the armorer’s cage with our weapons cards and traded them for a rifle, 5.56MM M16A1. Grab your gear and mount your vehicle. Our weapons were produced by well-known defense contractors: H&R, Colt, and GM. We had faith in our small arms, and they were generally reliable. Some, like the 1911 pistol, M3 SMG and M2 .50 cal. Machinegun, had been proven in multiple conflicts.
The gas tubes on those M16A1s were pinned into a front sight housing, which served as a gas block/front sight/bayonet mount. The design was simple and robust, as military weapons should be. This front sight was considered part of the barrel assembly and it was not removed for any reason.
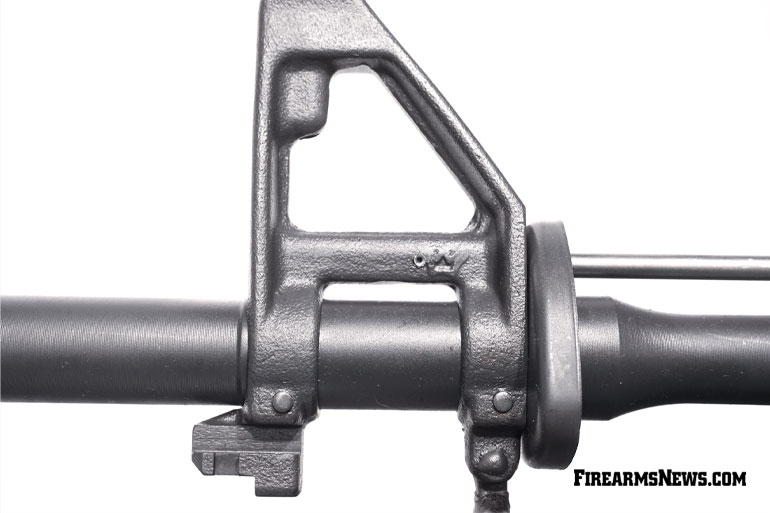
Fast forward 40 years, and the rifles we have today, although based on the original Stoner design, offer a dizzying array of options to the casual observer. Barrels are available in rifle, carbine and pistol lengths in various weights and with different-length gas systems. Stoner-pattern rifles are gas operated and the gas that drives them is tapped from the barrel through a gas port. A “gas block” serves as a conduit between the barrel port and the gas tube, directing gas back through the upper receiver to the gas key on the bolt carrier, driving the carrier rearward and unlocking the bolt. The gas block on your modern sporting rifle performs the same function as those M16A1 front sights did 40 years ago. It may look different, but is functionally identical.
Gas blocks are available in many styles. This article will help you choose the part you need for your build and demonstrate various installation techniques.
The first part I select for a build is the barrel, and then I assemble a rifle around it. Admittedly, the gas block is one of the last components I consider. Choosing one is as simple as running through a checklist. Factors to consider are listed and examined below.
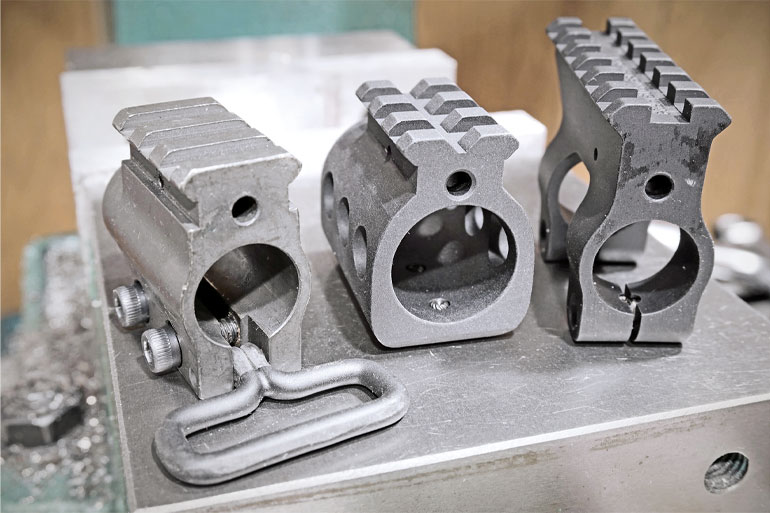
Barrel diameter at the gas port: First generation black rifles like the M16A1 and Colt SP1 sporter were equipped with lightweight “pencil” barrels measuring 0.625" in diameter at the gas port. In the 1980s, the M16A2/AR15A2 came along with a barrel that was heavier at the muzzle end, measuring 0.750". For all but the heaviest target barrels, 0.750" is still the standard today. If you are running a really heavy varmint or target barrel you may need a 0.875" or 0.936" gas block. Check your barrel diameter before ordering parts.
Adjustable or fixed gas port: Is the rifle we are building intended for duty or defensive use? I would lean toward a fixed gas block on a defensive rifle. Simple is good and less prone to cause problems when you don’t need them. On the other hand, adjustable gas blocks can smooth out rifles that are over gassed or frequently fired with a sound suppressor. Recently, I worked on a rifle from a major manufacturer sporting a 20-inch barrel and carbine-length gas system. It benefited noticeably from an adjustable gas block.
Barrel gas ports are a compromise size to allow the weapon to function with a wide variety of ammunition, from 5.56 NATO (hot) to imported steel-cased ammo loaded to moderate pressure levels. If you feed your carbine a steady diet of NATO pressure ammo, the gas can probably be turned down a bit while maintaining reliable function, but remember, we’re mainly talking about 5.56mm weapons that aren’t known for much recoil, so don’t get anal about adjustable gas blocks unless you just like to tinker with stuff. A standard gas block will work fine on most rifles.
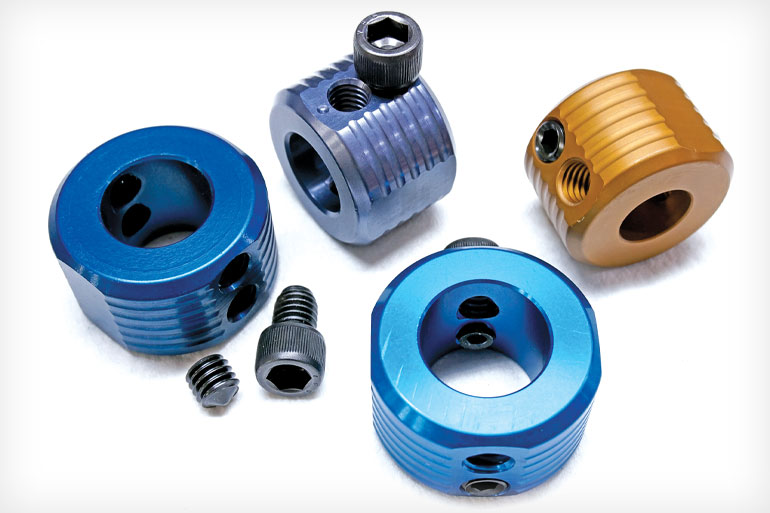
Attachment methods: Gas blocks may be attached with set screws, taper pins, and straight pins, or simply clamped on the barrel. Some are initially attached with screws and pinned afterwards.
Pinning: I would rate pinning as the most secure configuration for hard use. Military pinned front sight/gas blocks survive bayonet practice without loosening. Also, if you are building a rifle with the traditional two-piece plastic handguards retained by a delta ring and handguard cap, the pinned block is definitely the way to go, since there will be constant spring pressure from the handguards against the rear of it. That being said, pinned gas blocks require a fixture, or at least a pre-drilled gas block, to keep the drill bit from walking and are the most difficult type for a hobbyist to install. If a military-style front sight/gas block will be included in your build, I would recommend buying a barrel with it factory installed.
Clamping: Blocks that clamp to the barrel are a good option for the hobbyist and don’t require the services of a gunsmith or power tools. They can be a bit more difficult to line up with the gas port than a solid block. When a gas block is manufactured, the gas port is drilled through the bottom, leaving a nice inline hole for a set screw. Line up the dimple on the barrel with this hole and install the set screw. The barrel gas port should be perfectly aligned with the gas block port.
The problem with clamping gas blocks is that the hole is drilled before they are split, so it becomes offset when the block is sliced. You basically have to eyeball it and hope for the best. I line it up as best I can and test fire to verify function. If the test fire is successful, I Loctite the screws one at a time to prevent the block from shifting position. If the port isn’t aligned, it’s a simple matter to loosen the screws slightly and alter the position of the gas block until the weapon functions 100%.
Set screws: The most common gas block is the set-screw type. Set screw gas blocks are usually low profile to fit inside a free float forend and fastened to the barrel with a pair of cup point set screws. The set screws pull the block down tight against the barrel to prevent gas leakage. The barrel should be dimpled exactly opposite the gas port to center the block on the port and provide a secure mounting point that resists movement. Thread locker should be applied to the set screws during final installation.
Many set screw low-profile gas blocks appear to be based on the design developed by NSWC Crane for the Mk12 Mod 1 sniper rifle. A thin collar is topped with a cylindrical section drilled to accept the gas tube. The flat bottom is home to two set screws. Just about every manufacturer of gas blocks has copied the Crane minimalist design.
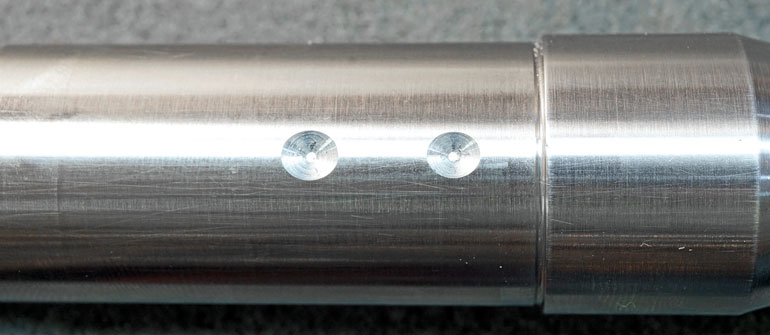
Dimpling the barrel: It is very helpful, when installing set-screw-type gas blocks, to dimple the barrel opposite the gas port. The rear gas block screw is tightened into the dimple, resulting in perfect centering of the gas block port to the barrel gas port. People will argue that the hole in the gas block is larger than the gas port, so a slight misalignment won’t affect function. True, but why would we tolerate misalignment, when we can perform the installation correctly with little effort? Dimples also result in a gas block that is less likely to move, as long as the screws don’t back out. This is especially true with nitrided barrels. The hardened surface won’t allow the set screw to bite into the steel. Dimpling will cut through the hard surface, exposing relatively soft steel for the set screws. In a perfect world, all AR barrels would be dimpled from the manufacturer, and some are, but I see a disturbing trend away from it. AR barrel prices seem to be in a race to the bottom, and skipping the dimple may save them a buck or two on the bottom line.
There are a couple methods for dimpling a barrel I will cover here.
Method one assumes a hobbyist without access to a mill or mill/drill. For this method, you will need an electric drill, a dimpling jig, the appropriate size drill bit and a vise.
Select a dimpling jig that matches your barrel diameter (0.625", 0.750", etc.) and the screw-hole spacing of your gas block. Be advised that different brands of gas blocks space the screws at different distances. To determine hole spacing, center-to-center measure the distance between the inside edges of the two holes with a caliper, and add one hole diameter.
A jig I have used quite a bit is from Black Rifle Disease Engineering (BRD) and sold by Brownells (100-006-130). This jig has a 0.460" hole spacing to fit Vltor, BCM, SLR and Midwest Industries gas blocks. BRD also offers jigs with 0.420" and 0.500" on its web site (brdengineering.com). All BRD jigs are for 0.750" diameter barrels and “pro” versions are available for gunsmiths with hardened drill bushings for frequent use. The standard jigs are simply unhardened steel but suffice for the hobbyist.
SLR Rifleworks (slrrifleworks.com) offers an interesting selection of dimple jigs for 0.625", 0.750", 0.875" and 0.936"- diameter barrels with hole spacing for both 0.400" and 0.450". Both brands of jigs are simply collars that slip over the barrel with a pointed screw that is tightened into the gas port. Flip the barrel over and drill dimples through the holes in the bottom of the jig. The SLR jigs are aluminum with replaceable hardened drill bushings. Drill bit sizes are 11/64" for BRD and 5/32" for SLR.
Ready to dimple? Install your jig on the barrel. Secure the barrel in a vise with non-marring jaws, bottom side up. Install the appropriate drill bit in your portable drill and spot the barrel through the holes in the jig, only as deep as the tip of the drill bit, so they are full diameter, but not any deeper. Remove the jig and clean up any chips. Done. If you are dealing with a nitrided barrel, there will be an additional step. Nitriding results in a very hard, thin surface, much like case hardening. A standard high-speed steel drill bit won’t scratch it. Trust me. Mark the locations of the dimples and use a Dremel with a carbide burr to remove the black skin and expose the untreated metal. Install the jig and spot your dimples. A carbide drill bit will punch through the hardened surface, but a ridgid set-up is recommended (drill press or mill). Carbide is brittle and easily broken.
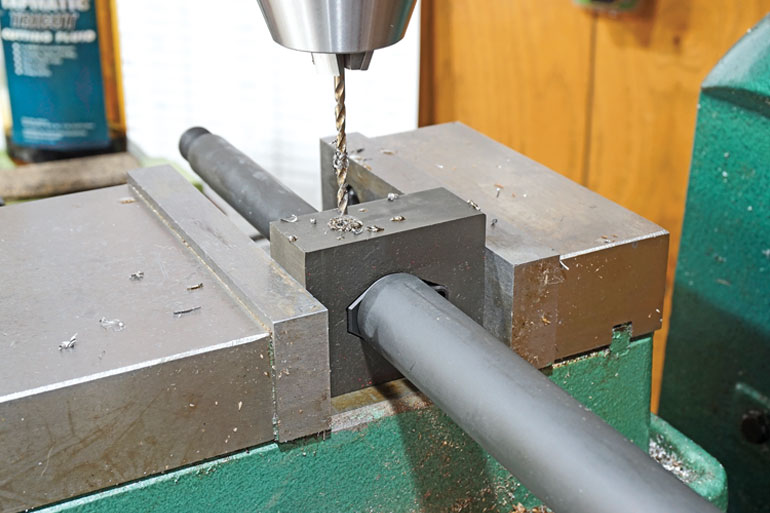
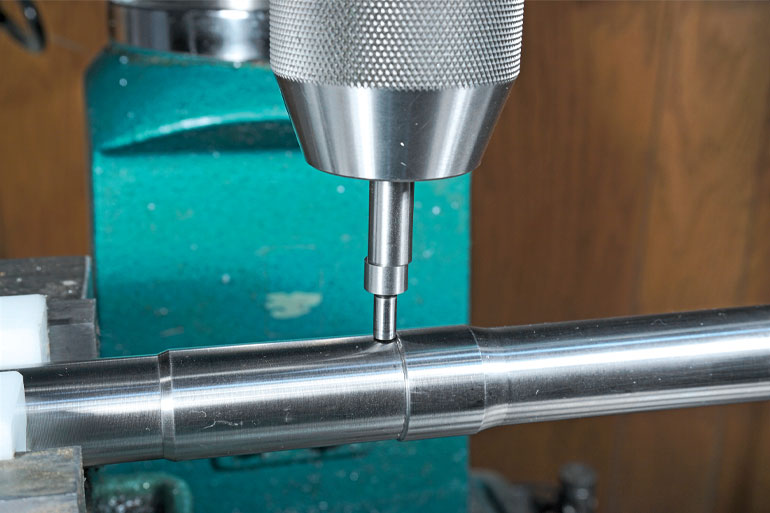
Method two requires a milling machine or mill/drill, an edge finder, calipers, gage pin or drill bit to fit the gas port, and a spot drill. The barrel is installed in the upper receiver.
Insert the largest gage pin into the gas port that will fit. Wire gage drills will work if you don’t have gage pins. Using the .308 barrel below as an example, the gas port accepted a 0.093 gage pin or #42 drill bit. Measure the distance from the barrel shoulder to the gage pin and add half the diameter of the pin to that figure. This number is the distance from the shoulder to the center of the gas port or rear gas block dimple. In this case, it’s 0.296". The first question that comes to most minds is, “What if I’m a few thousandths off in my measurement?” Not to worry. The gas port in the CMMG gas block is much bigger (.135") than the barrel gas port (0.093"). A slight misalignment won’t have any effect on function.
Secure the barrel with the upper receiver installed upside down in the machine vise and level it across the bottom of the upper receiver. Find the center of the barrel (Y axis) with the edge finder and zero the X axis on the barrel shoulder. Move the table over 0.296", and spot drill the barrel. A spot drill is stub length with very little flute and designed to be more rigid than a common twist drill, so it won’t deflect when spotting a curved surface, such as a barrel. If a spot drill isn’t available, a center drill could be substituted. Move the table again .450" (or whatever the center-to-center distance is between the screws in the particular gas block you are using) and spot drill again. Done. Installing a set screw gas block: Let’s install a set screw gas block on a barrel and walk through each step in detail.
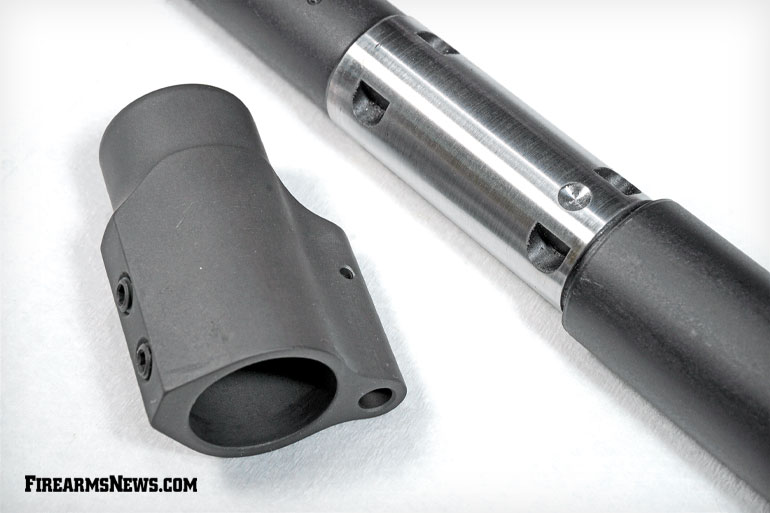
First, we select a gas block. This heavy Criterion target barrel is 0.936" at the gas port, so that narrows the available choices considerably. A minimalist, non-adjustable set screw block is all that is needed, so I purchased a CMMG 0.936" low-profile steel gas block from our friends at Brownells (100-019-255) for less than $40.
Next, test fit the gas block. A slip fit is good. This means the internal diameter of the gas block and the diameter of the barrel at the gas port are within a couple thousandths. I can slide the block in place with finger pressure, but it isn’t loose.
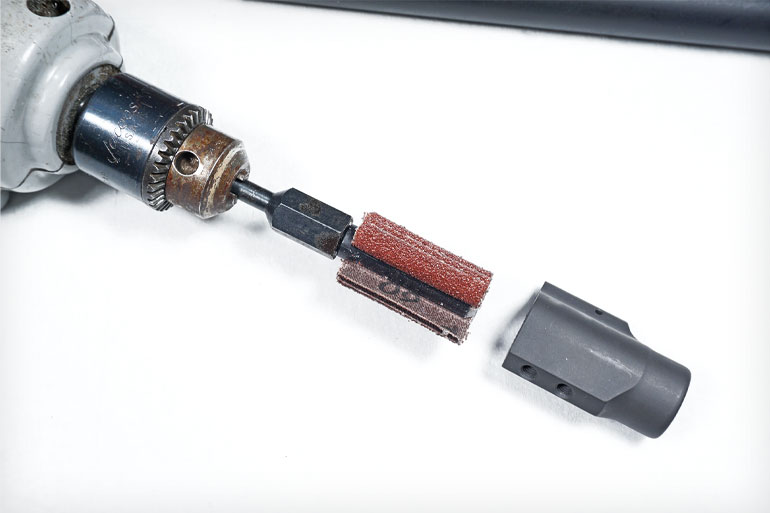
A gas block may be too tight and require fitting. The temptation for a quick fix by sanding the barrel at the gas port is great, but I would advise against it. ALWAYS MODIFY THE CHEAPEST PART. If you screw up, you could irreversibly damage a $300 barrel or a $40 gas block. Your choice. My preferred technique for fitting gas blocks is to buff the inside surface with a fine abrasive to remove a very small amount of material. A bore polisher is called-for here. This tool is simply a shaft with strips of sandpaper epoxied to it, available in different grits and threaded for an arbor, which can be chucked into a common hand drill (part number 97986517 from mscdirect.com). Start with a fine grit and go slowly, test fitting frequently. The gas block should be secured in padded vise jaws during this operation.
If the barrel isn’t already dimpled, do it as described above. Always verify the distance between the screw holes before spot drilling the second dimple. The CMMG gas block I’m installing on this barrel was said to be 0.450" spacing, but I carefully measured it several times and kept getting 0.470", so I spotted the holes for that distance, and they lined up nicely.
Now, let’s talk about fastening this gas block permanently to the barrel. It is supplied with two 8-32 cup point set screws. For an explanation of what those numbers mean see the sidebar in this article on screw threads. Cup points are designed to dig into the material they are tightened against and are excellent at resisting vibration. A further improvement on the standard cup point is the knurled or serrated type. A box of 100 knurled set screws is less than $20 from mscdirect.com (part number 60551033), so I keep them on hand in the shop for gas block installations. The original set screws are removed from the gas block, and the mounting surface of the barrel and the gas block are thoroughly degreased. I simply drop the gas block into a jar of lacquer thinner to remove any preservative oil.
Consider assembling the gas tube to the gas block before it is fastened to the barrel and DON’T FORGET THE BARREL NUT if the barrel isn’t already assembled to the upper receiver. It will be a bad moment when you’re admiring your gas block installation and you suddenly realize the barrel nut is still on the bench (ask me how I know).
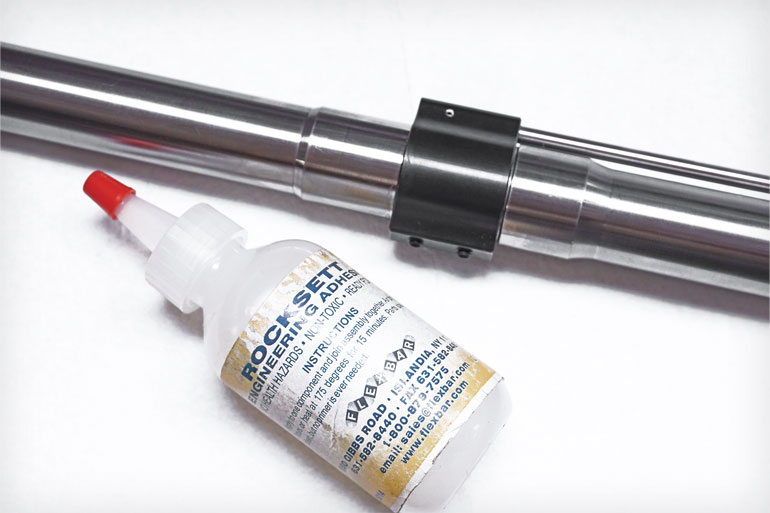
Slide the gas block on to the barrel, and line it up with the nice dimples you just created. Apply a heat-resistant adhesive to the holes. Flexbar Rocksett (Brownells 100-010-681) works well in this application. There are also Loctite products, such as 609 Sleeve Retainer, that are applicable. Rotate the gas block slightly left and right to spread the adhesive. If the adhesive is applied to the barrel before the block is in position, the block will push it toward the barrel shoulder and most of it will drip on to the bench. Apply a drop of adhesive to the rear screw, and install it slowly, while wiggling the block a bit, so the screw finds the center of the dimple. Install the front screw, and wipe away any excess adhesive. Check your work. Be advised that the set-up time for some adhesives is relatively short, so if you installed the gas block backwards, it must be corrected immediately.
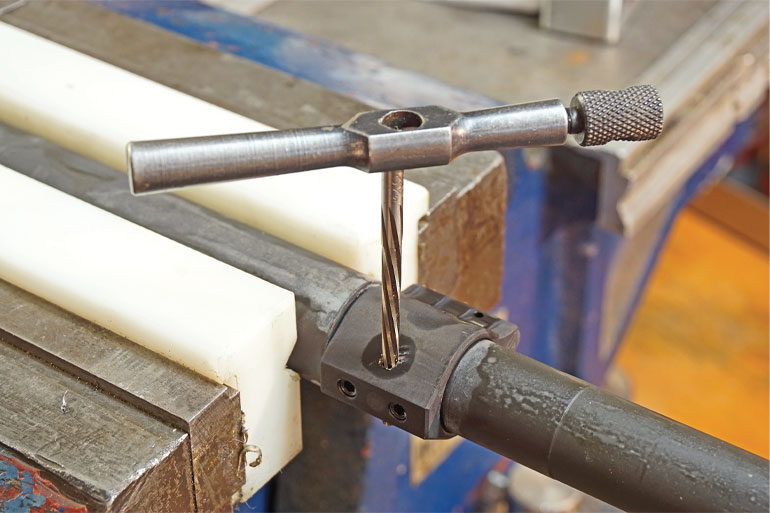
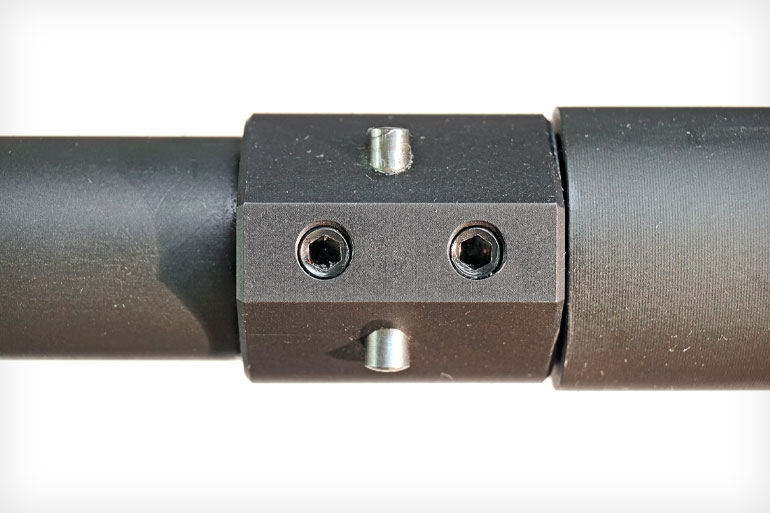
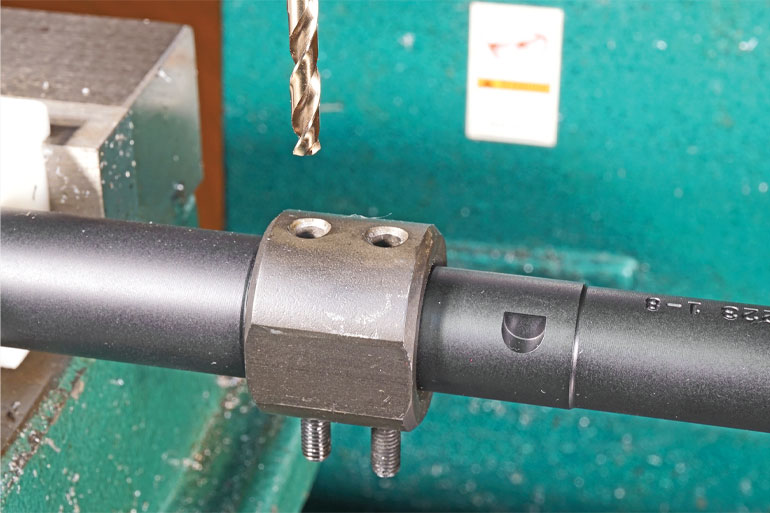
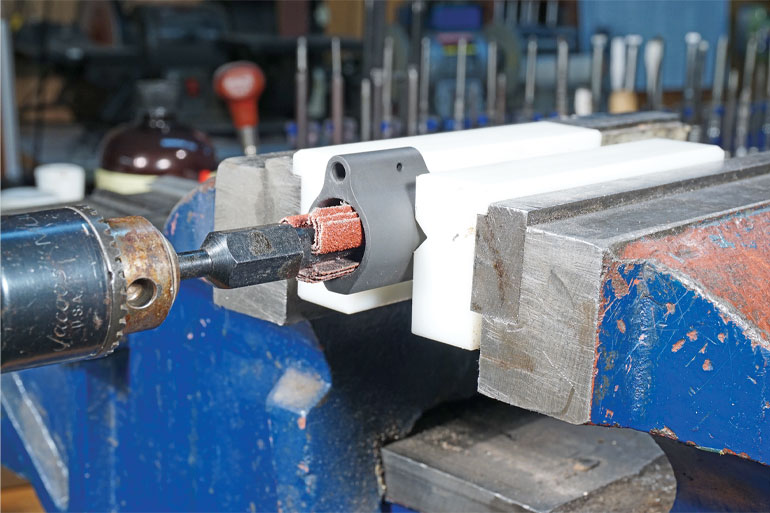
Pinning gas blocks: Pinning a gas block is best done with a dedicated fixture. A hole must be precisely drilled through the edge of the barrel, without deflecting off the round surface. Not to worry. Simple fixtures for use on a drill press (or even with a hand drill) are available from BRD Engineering (brdengineering.com) for popular styles of gas blocks. Our demo gas block is a Vltor product (Brownells 100-011-111) similar to most low-profile set screw models. This particular BRD fixture (100-006-129) is bored to accept the external profile of the Vltor block, but other styles are available directly from BRD.
The set screw gas block has been installed on the barrel using the above technique. Install the BRD jig over the gas block, and secure it with the soft point set screw. Clamp this assembly into the drill press vise on its side. Drill completely through the gas block and barrel with a #31 drill bit, using the hole in the fixture as a guide. Remember, if your barrel is nitride-treated, you will need a carbide drill. Standard HSS or even cobalt drills probably won’t penetrate the hard surface.
Once the hole is drilled, remove the fixture. Ream the hole gradually with a 2/0 taper pin reamer until the taper pin is centered when it is tapped in place. Reaming under power is ok to start, but you might want to finish the last little bit by hand with the reamer in a tap wrench so you don’t go too far. Taper pins are available in bulk from industrial supply companies for around thirty cents each (mscdirect.com #67548487) if you need spares. A drop of Loctite or Rocksett on the pin during final installation isn’t a bad idea.
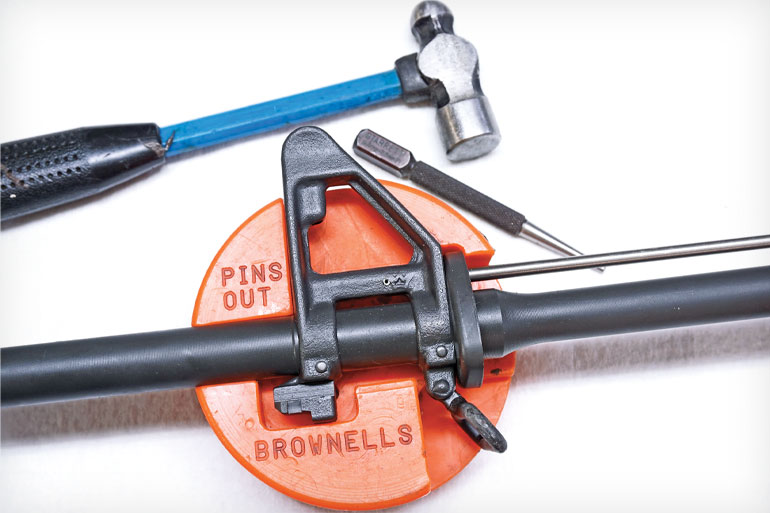
Removing factory-pinned front sight towers: You may run into a situation where you need to remove a military-style pinned front sight. Taper pins tend to have rounded ends, so using the proper punch when removing or installing them will prevent dings around the pins from the punch slipping. A starter punch with a concave tip like a nail set (Brownells 827-530-320) to get tight pins moving may be required. The sight tower should be properly supported in a bench block designed for that purpose (080-000-252). Some of the old factory Colt pins are really stubborn, but they will all come out. Finally, make sure you are hitting the small end of the pin to remove it.
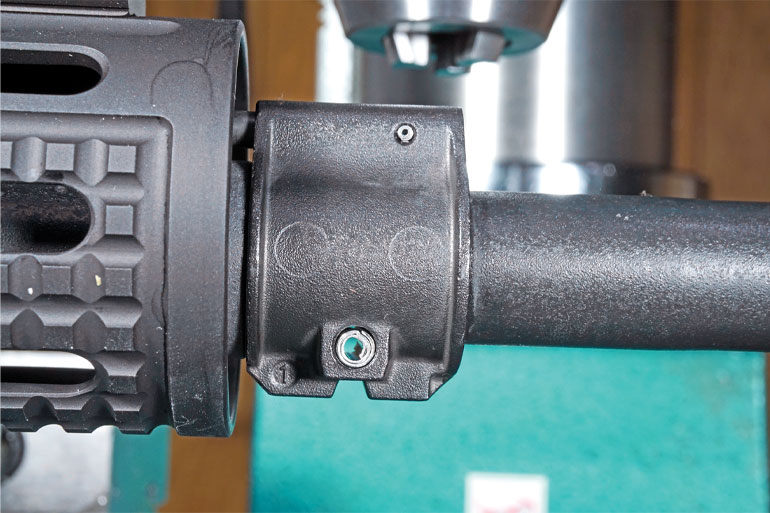
Clamping gas blocks: If a clamping-type gas block suits your needs, you can dispense with dimples and taper pins. Remove the screws and degrease them. Install the gas tube, and slide the block on to the barrel. Position it by eye for vertical alignment. Usually, a block is not designed to bear solidly against the barrel shoulder, so leave a slight gap of 0.020" or so. Once again, the port in the gas block is larger than the barrel gas port, so slight misalignments are ok. Install the screws with a thread locker, such as Loctite. Keep in mind that some clamping gas blocks are taller than the standard low-profile set screw type, due to the boss on the bottom.
A boss is an extension on an attachment designed to accept screws or other fasteners. On a clamping gas block the screws provide the clamping force to secure the assembly to the barrel. A small diameter free float forend may not fit over it.
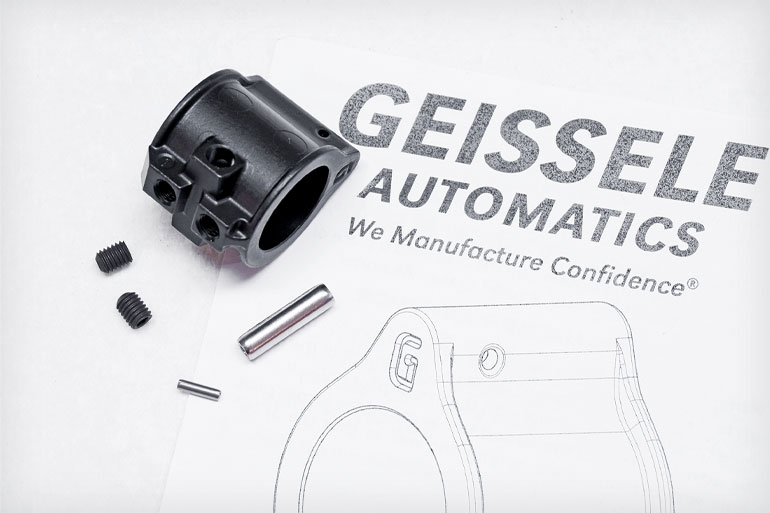
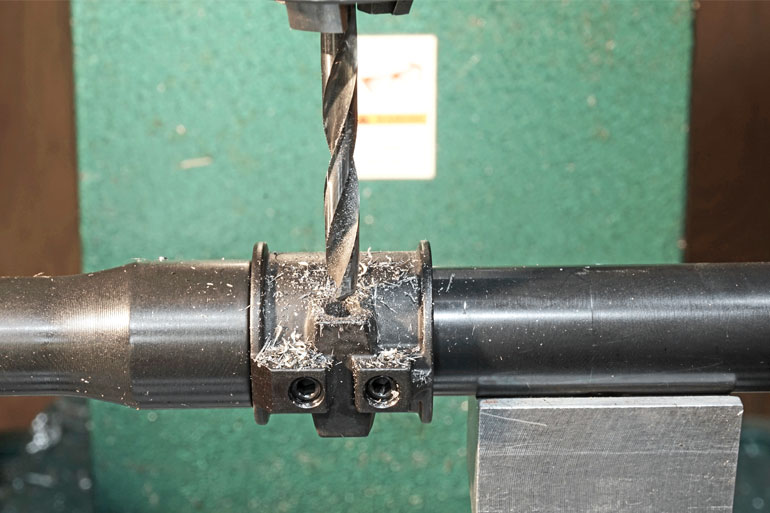
Geissele Super Gas Block: We’ve covered set screw installations and pinning a set screw gas block with a fixture. What if a set screw gas block was designed with an extra boss on the bottom with a hole through it for pinning without a fixture? Geissele has done just that. Its Super Gas Block (100-014-198) fits .750 barrels and installs like any other set screw block. But then, the hole in the boss becomes a drill guide, so it can be drilled for a hefty spring pin. No taper pin reamer is required.
Geissele describes pinning the block as a “bomb-proof installation.” This is my favorite gas block, hands down. It sure would be nice if an adjustable version was available for those odd situations where we need one. Cost is $39 to $69, depending on whether you choose carbon steel (cheapest), nitride, or stainless steel. This product is well thought-out and worth the price. I would like to see more gas blocks with optional pin holes in them.
Railed Gas Blocks: Railed gas blocks provide a short rail for mounting a front sight and are usually encountered on weapons with two-piece plastic handguards. This type of block is less and less common, as consumers have moved away from barrel-mounted fixed front sights to full-length, free-floating forends with folding backup sights on them. However, they are still encountered on older guns. Railed blocks are usually of the set screw or clamping type and are available in two different heights. A block that is “rail height” matches the height of the upper receiver rail, so standard folding sights you would use on a free-float forend will work. “Gas block” height is lower and requires front sights specifically designed for gas blocks.